12 Jan 2014 on web and iot
Quick start projects
Often we have about 3 to 4 active projects. I am using a simple bash script with tmuxinator to fire up all the related elements of a single project so that it is ready to code in less than 10 seconds.
Let's say we have 3 to 4 active projects at any one time. These projects might include, a couple of client projects, a side project or even a blog. Every time when starting each of these projects, typically the following applications need to be opened:
- Text editor with different folder paths
- Command line with various panes and tabs
- Some native applications
- Browser with various tabs
For each of the projects, the exact requirements to the above 4 applications definitely differs. For example, the browser needs to be opened in a different localhost port for different projects along with links to Github or Trello.
For the past few months, I have been automating the opening up of various project related elements with a single command - the project name itself. Here's how the effect looks like when I open up various application with a single command to work on my blog:

What you need
- Alfred app (optional) for launching a shell command
- Simple Bash scripting to create a script
project-name - Tmux and Tmuxinator installation to create a tmuxinator project file
project-name.ymlbrew install tmux gem install tmuxinator
With AlfredApp, we can call the shell command without launching any command line application with a simple prefix of >. The bash script that we will create will open up various applications, url and paths in the Finder. Tmux is a terminal multiplexer and I use it more oten to layout the arrangement of windows and panes that are running different commands.
Let's take the example of this blog itself and create the 2 files:
blog(bash script)blog.yml(tmuxinator project file)
Create the script file
Usually, I just name the file as the project. In this case, it will be simply blog. As this file needs to be an executable, we will also change the file permission with the command chmod. Lastly, we will symlink this file to a file in a directory where all such automated scripts are stored. This directory has to be found in your path variable $PATH. Now, this script can be run from any location.
$ touch blog

$ ls -al blog
-rw-r--r--  1 sayanee  staff  0 Jan 11 22:24 blog

$ chmod u+x blog

$ ls -al blog
-rwxr--r--  1 sayanee  staff  0 Jan 11 22:24 blog

$ ln -s blog /current/path/blog
The exact contents of the script file will vary project to project, but it generally consists of the following:
- path to the source code is defined
- open the source code in window and text editor
- open some native applications and they might include:
- version control
- database visualiser
- graphic editing software
- open project management tools or remote repository in browser. I have used the following:
- Pivotal Tracker
- Github with link to the open issues assigned to me
- Trello board of the project
open the project url in the browser
- production url
- development url - might include admin / testing / documentation url
open the tmuxinator project
Here is an example of the blog script file.
#!/bin/bash

# USAGE in the command line:
# blog

app="/Users/sayanee/Sites/blog/app" # path to source code

open $app # open in Finder
subl $app # open in text editor
cd _posts && open `ls -tr | tail -1` # open last modified file (latest post)

open /Applications/Tower.app # open version control visualiser

open https://github.com/sayanee/blog/issues/assigned/sayanee?state=open # open git remote repo assigned to me

open http://localhost:4000 # open in development
open http://blog.sayan.ee # open in production

tmuxinator blog # open tmuxinator project
Create the tmuxinator project
Next, we will create the tmuxinator project file that will define the various window, panes and commands to fire when starting the project. Let's first create the file blog.yml and create a symlink to the ~/.tmuxinator folder.
$ touch blog.yml

$ ln -s blog.yml ~/.tmuxinator/blog.yml
In the Tmuxinator project, I will define various windows for the following purpose depending on the project:
- frontend server e.g.
sudo nginxwith Nginx - backend server e.g.
rails serverfor Rails - automated testing
- continuous build tool e.g
gruntfor GruntJS - ssh into the production server e.g.
ssh production && cd path/to/source - repl e.g.
nodefor NodeJS orirbfor Ruby
For this blog, the Tmuxinator project is pretty simple consisting of 1 window with 3 panes.
name: blog
root: /Users/username/path/to/blog
windows:
  - blog:
      layout: main-vertical
      panes:
        - git pull origin gh-pages && clear && ls
        - jekyll serve --watch --config _dev_config.yml
        - grunt
With the command tmuxinator blog, a tmux session will be started that will look like this:
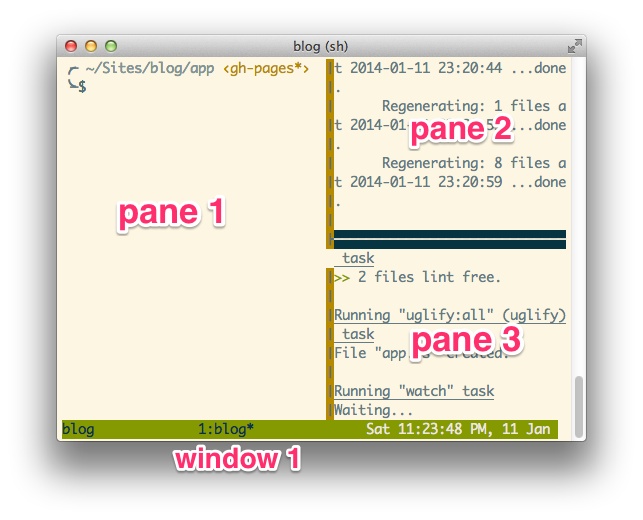
And that's all! With these 2 simple files, now whenever we trigger the command blog all the project related elements will open up within seconds!
Another example
The blog command is pretty simple, so I thought of giving another example for a project called todo. This project consists of full stack development with frontend and backend.
Here's the content of the bash script todo:
#!/bin/bash

# USAGE in the command line:
# todo

app="/Users/sayanee/Workspace/todo"
backend="/backend"
frontend="/frontend"
apidocs="/apidocs"

open $app
subl $app$backend
subl $app$frontend
subl $app$apidocs

open /Applications/Postgres93.app # db
open /Applications/Tower.app # git management

open http://localhost:8000 # frontend
open http://localhost:4000 # api documentation
open http://localhost:3000 # backend

open https://github.com/username/todo-frontend/issues/assigned/sayanee?state=open
open https://github.com/username/todo-backend/issues/assigned/sayanee?state=open

open https://trello.com/b/xxxxxxx/todo-board-overview # trello tasks

tmuxinator todo
And here is the tmuxinator project file todo.yml with 4 windows opening up the development for frontend, backend or api documentation and lastly even the production server. When starting to code, I usually like to do a git pull to sync my code base with the remote repository. Also, when logging into the production server with ssh, I directly cd into the direcotry required.
name: todo
root: /Users/sayanee/Workspace/todo
windows:
  - backend:
      layout: main-vertical
      panes:
        - cd backend && git pull
        - cd backend && rails console
        - cd backend && rails server
  - frontend:
      layout: main-vertical
      panes:
        - cd frontend && git pull
        - cd frontend && grunt
        - cd frontend && sudo nginx
  - apidocs:
      layout: main-vertical
      panes:
        - cd apidocs
        - cd apidocs && npm start
        - cd apidocs && redis-server
  - production:
      layout: even-vertical
      panes:
        - ssh production -t "cd /path/to/backend ; /bin/zsh"
        - ssh production -t "cd /path/to/frontend ; /bin/zsh"
Fast context switching
One of the challenges of getting into the zone of creativity is how fast and easily we can launch the various applications and commands to get started, especially if we are spending some time launching them often. Here are some other projects that I found that helps in launching current projects fast:
Would love to know if there is a better or alternative way to launching applications other the current method that I am using. What are your thoughts?
How do you quick launch your various active projects?
Update: You can also follow this discussion on Hacker News with more ideas on how others are implementing this.