04 Jan 2014 on web and iot
Setting up my new MacBook
I got a brand new 15 inch MacBook just a few weeks ago. Here are some apps and settings I did to customise it.
Having a brand new computer is like having a chance to sharpen your tool so that when we work with it, we are in a flow. I took about 7-8 hours in total to get everything working!
Model Name:    MacBook Pro
Model Identifier:   MacBookPro11,2
Processor Name: Intel Core i7
Processor Speed:    2 GHz
Number of Processors:   1
Total Number of Cores:  4
L2 Cache (per Core):    256 KB
L3 Cache:   6 MB
Memory: 8 GB
Before the setup
Apart from any data, in terms of settings, a few things came in really handy as I had them either as a user account or the configurations stored as a Github repository:
- Chrome's user login - useful for all bookmarks and recent browsing history
- Dotfiles - useful to keep a list of frequently used config files
- Sublime Text settings - any text editor is a major tool and its handy to keep its settings
- Apple account - useful to download apps that I already had before
- Setapp as a reference to all the tools and apps I use
Apps to download
I started setting up the MacBook with the installation of the Chrome browser and then some apps from the App Store. XCode with Command Line Tools are almost always needed as they install GCC, Clang-LLVM and many other developer tools.
From the App Store
- XCode and its Command Line Tools
- LiveReload
- Dash for easy documentation reference while programming
- Codebox for storing quick code snippets
- Sketch for making simple vector graphics for favicons or logos
- Skitch for quick annotation of screenshots
Other apps
- Sublime Text 3 as my main text editor
- iTerm2 as a replacement for Terminal
- Applets for Finder toolbar to quickly open the folder in Iterm2 or Sublime Text
- AlfredApp as a quick launcher with Minimal theme
- Caffeine to prevent sleeping
- App Cleaner
- Mou App for writing my markdown for
readme.mdfiles - ShiftIt for Finder window positioning with shortcut keys
- Tower to quickly see my version changes with git
- Postgres.app for database
Finder, Display, Keyboard and Files
The thing about configuring a brand new machine is that you become aware of the little settings that you are always used to. Here are my settings for the Finder:
Show Path Bar, Sidebar, Status Bar.
Finder > View > Show Path Bar/Status bar/Side bar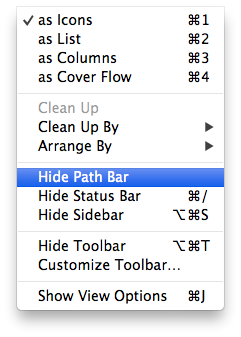
Search in Current Folder and show file extensions.
Finder > Preferences > Advanced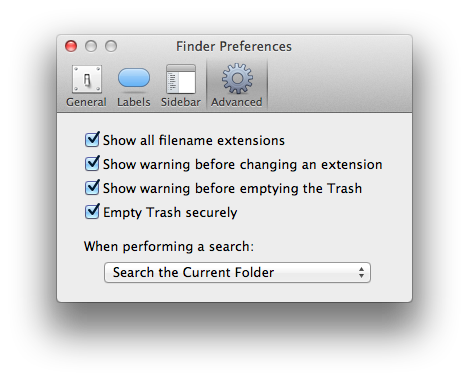
Applets for Finder toolbar to quickly open the folder in iTerm2 or Sublime Text

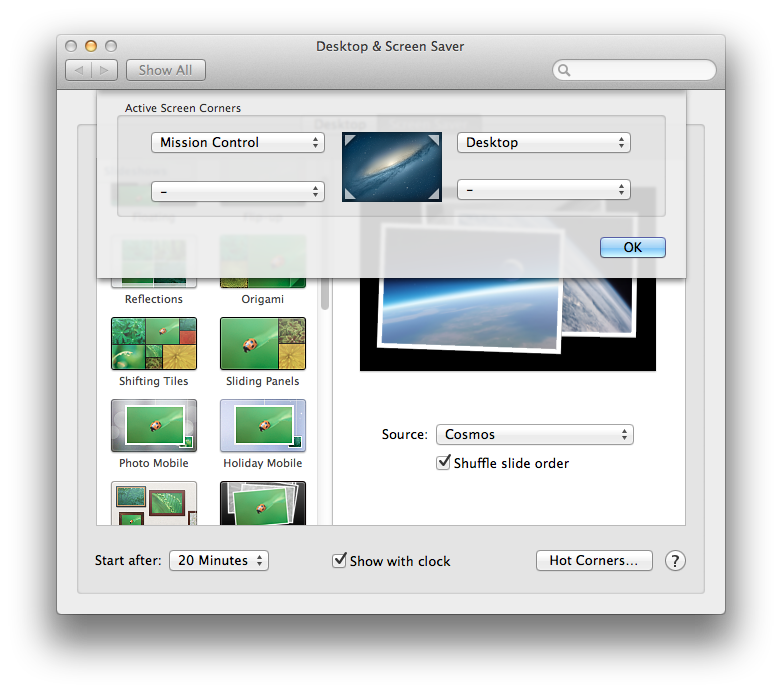
I also like to have Hot Corners for easy access to the Desktop and have a snap shot of all the running application windows. Setting: System Preferences > Desktop & Screen Saver > Screen Saver > Hot Corners
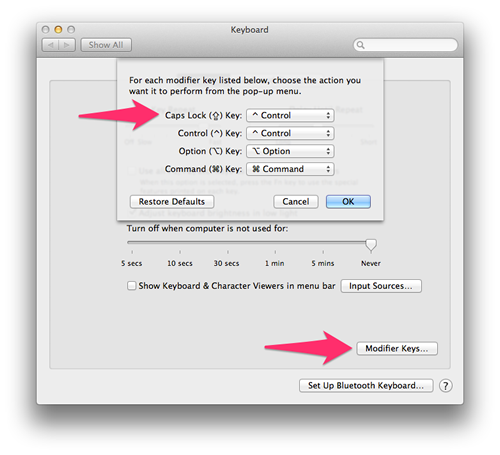
I have remapped my almost-never-used Caps Lock key to Control key. This comes in really handy when using with Tmux key bindings as ctrl-a is just 2 keys side by side. Setting: System Preferences > Keyboard > Modifier Keys > Caps Lock Key
In terms of hidden or dotfiles, I like to show them. The following command in the Terminal will enable them:
defaults write com.apple.finder AppleShowAllFiles -boolean true ; killall Finder
Installed packages
The final step was to install the various packages that I use when I am programming. I started by installing the package manager brew and then updating and upgrading brew itself. I installed some packages like wget, autojump and tree - useful when working in the command line, jumping from one folder to another or displaying the contents of the folder.
ruby -e "$(curl -fsSL https://raw.github.com/Homebrew/homebrew/go/install)"

brew update
brew upgrade

brew install wget
brew install autojump
brew install tree
brew install terminal-notifier
brew install tmux
Next I installed packages that I use while programming in the Ruby ecosystem. I started with RVM, then Ruby itself, Git and RubyGems. Setting up Git and then generating SSH Keys had me setup my Github as well.
\curl https://raw.github.com/wayneeseguin/rvm/master/binscripts/rvm-installer | bash -s stable

rvm get stable

brew install git
Next, I installed Node releated packages. The main installer on the Node website comes with both Node as well as NPM, so I downloaded that. Also, just like Ruby's RVM, I use Node's NVM for managing Node versions. Finally, I installed some commonly used global packages like Grunt and Bower. Here are the steps:
curl https://raw.github.com/creationix/nvm/master/install.sh | sh

npm install -g grunt
npm install -g grunt-cli

npm install -g bower
Sharpening the Tools
I've known people who have not mastered their tools who are good programmers, but not a tool master who remained a mediocre programmer. ~ Kent Beck
Recently, I listened to a lovely episode from the RubyRogues on Sharpening the Tools. Couldn't agree more with the fact that as we are making and creating stuff, we will have to continuously keep note of steps that we are repeating or steps that are mildly erking us.
Can we do it smaller number of steps or in an easier way? I'm keeping a little scratch note of this and every few weeks I go back to it and find ways to improve. Whether it's amending my bash prompt to contain more information or linting while coding in my text editor - all these tiny steps add up to ease me into the flow of creativity every time I get down to work.
I would love to hear from you too!
What apps or packages do you use very often? How do you keep sharpening your tools?
Update: After getting some more tips, I have also install:
- FileZilla for ftp
- Kindle app to read
*.mobiformat Kindle eBooks - QuickLook plugins
- Sequel Pro for MySQL db management